We initially retrieved data from the AT30TS750A using the default configuration from the manufacturer, but had the ability to modify the measurement resolution in the chip initialization function. Let’s go a little further and by configuring the AT30TS750A, use one button press to tell the temperature sensor to change the resolution and another button press to perform a temperature measurement.
Objectives
- Use buttons on the Education Shield as digital inputs.
- Write a function that modifies the measurement resolution in response to a button press.
- Write a function that performs a temperature measurement in response to a button press.
Background
AT30TS750A Functionality Overview
Retrieving Temperature Value
Atmel AT30TS750A Datasheet
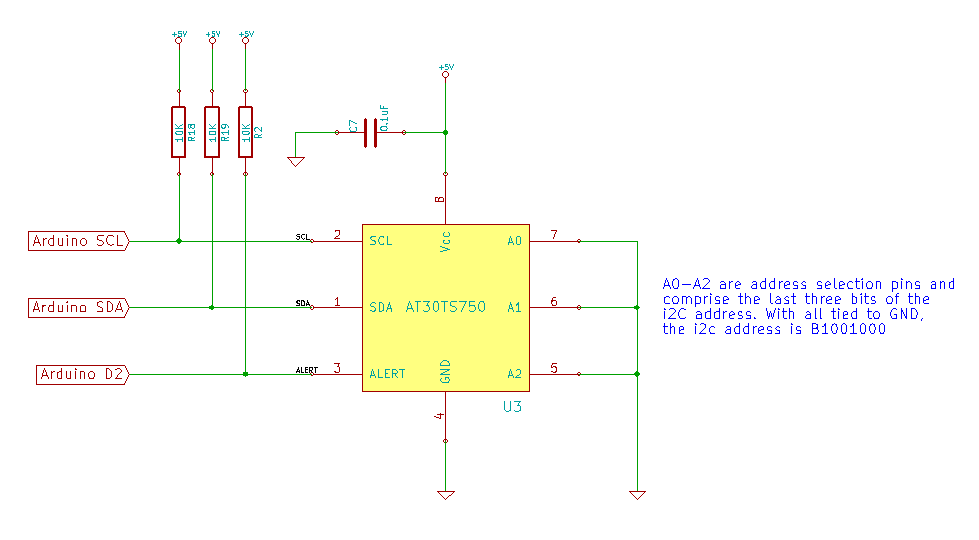
Schematic
Education Shield – AT30TS750A Temperature Sensor Subsystem
Education Shield – Shift Register Subsystem
Setup
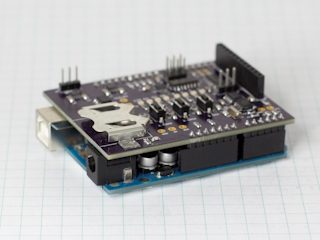
For this module, you’ll need the following equipment:
- I2C and SPI Education Shield or the AT30TS750A and Debounce Button Breakout Boards
- Arduino UNO R3
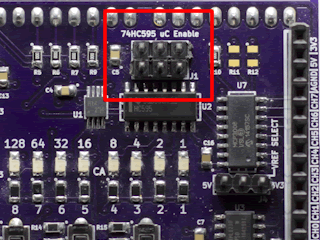
1. Place jumpers on the 74HC595 Enable block along the edge of the Education Shield. This will enable the microcontroller to read button presses.
2. Mate the Education Shield with your Arduino UNO R3. If you’re using the AT30TS750A Breakout Board and the Debounce Button Breakout Board, check the labels by the pins and for the AT30TS750A connect 5V to 5V, GND to GND, SC to Analog 5, SD to Analog 4 and AL to Digital2 and for the Debounce Button Board, connect 5V to 5V, GND to GND, and B1 to Digital8 and B2 to Digitl7.
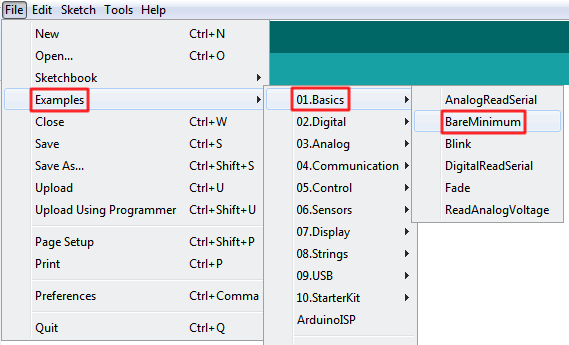
3. Finally, connect your Arduino to your USB cable, and use the Arduino IDE to upload the “Bare Minimum” sketch from the Basics section of the Examples.
Starting Point
Using the code from the previous tutorial, we are able to tell the AT30TS750A to measure the temperature in one of four different resolutions: 9, 10, 11 or 12 bits. We modify the resolution in the init_AT30TS750A() function that we call from setup…
|
1 2 3 4 5 6 7 8 9 10 11 12 13 14 |
void init_AT30TS750A() { /* Change the resolution of the temperature measurement 0x00 = 9 bit resolution 0x20 = 10 bit resolution 0x40 = 11 bit resolution 0x60 = 12 bit resolution */ Wire.beginTransmission (AT30TS750_I2C); Wire.write (REG_CONFIG); Wire.write (0x20); // Set Measurement Resolution Here Wire.endTransmission (); } |
Additionally, the code just performs a temperature measurement each time through the loop, which is effective, but noisy, because it’s constantly talking.
What To Change / What NOT To Change
Knowing that we want to modify the resolution on the fly, you might think that we should just rename the initialization function and call it from a button press, but no. You always want to have a starting point, an known frame of reference, from which to move from. It’s like initializing all your variables to zero; they’re not going to stay at zero, but it’s nice to know what the value is when it’s first starting out. So we’ll leave our initialization routine in place and set it to the least specific measurement level of 9-bits, 0x00. We will create a function, though, to cycle through the resolution, but only after we’ve set it to a known state.
The temperature measurement routine that exists in the loop we can move though. Since our code is going to be doing more things in the loop than just measuring the temperature, it would be good policy to move it into it’s own function anyway for tidiness, despite only being a handful of lines of code.
Configuring the AT30TS750A On The Fly
Let’s start with our configuration change. We’re going to leave the initialization function, and we’ll use it to establish an initial resolution of 9 bits. Now we’ll start adding in the bits and pieces we need to establish the change on button press. We’ll need to add a few things to our code…
- Select and define a button to perform the change
- An array holding the possible resolutions
- Some way of knowing where we are in the array
A lot of the code is the result of multiple iterations of testing; I didn’t just think it up straight away. I’m trying to balance making a clear tutorial against showing the thought process behind it. So rather than give you the code that doesn’t work, showing you it doesn’t work and then starting over with good code, I’ll try to walk you through how the correct answer was derived in the first place and save you the time.
For a button, I like to always start with the LATCH button on the Education Shield. We can press that any time, for the most part, without affecting what the 74HC595 might be doing. Looking at the silkscreen on the Education Shield, you’ll find that the latch button corresponds with Arduino Digital 7. We’ll define digital 7 as resolutionButton in the top housekeeping portion of our sketch, and set the pinmode as input in the setup.
|
1 |
const int resolutionButton = 7; // LATCH button used to set resolution |
|
1 |
pinMode(resolutionButton, INPUT); |
The array is fairly simple, it needs to hold four values corresponding to the hex values you would set in the configuration register for the four bit resolutions: 0x00, 0x20, 0x40, and 0x60. We’ll call it resolutionLevel.
|
1 |
int resolutionLevel[4] = {0x00, 0x20, 0x40, 0x60}; // Array of resolution levels, corresponding to 9, 10, 11, and 12 bit resolution set in the config register |
Now there are a couple of ways we can handle the pointer, and it requires us to think ahead a little and examine how the actual resolution change is going to work.
1. We could let it hold the current value of the resolution, then send the next level to the AT30TS750A using an I2C Write statement by saying something like “write resolutionLevel[resolutionPointer++]”, meaning send the value in the resolutionLevel array that is one higher than the current resolutionPointer value, because the pointer holds the current level. The problem: what do you do when you’re already at the highest resolution level. You can’t use an if statement in there.
2. We could let it hold the next value of the resolution, then send the existing pointer value to the AT30TS750A. That allows us to do the incrementing and resetting from 12 bits to 9 bits outside all the I2C negotiations.
Obviously, I selected to go with option 2. That means that when we get to the function that will increment the resolution, we’ll want it to already have the pointer set to the next level. Further, when we do it the first time, we’ll need to make sure it’s pre-seeded with the upcoming value. So consequently, instead of creating our resolutionPointer variable and initialization it with a zero, we’ll actually set it to the array position corresponding to 0x20.
|
1 |
int resolutionPointer = 1; // Holds the position inside the resolution level array, preset to 0x20 |
Configuring the AT30TS750A using the increaseResolution Function
We have the nuts and bolts of our little resolution changer machine, now we just have to hook them together. First let’s write the mechanism that actually changes the resolution, then call it via the button press. Here’s the code…
|
1 2 3 4 5 6 7 8 9 10 11 12 13 14 15 16 17 18 19 20 |
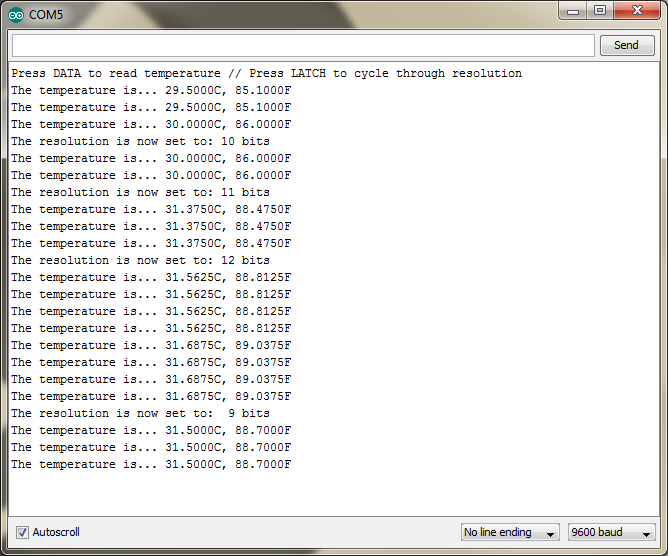
void increaseResolution() { Wire.beginTransmission (AT30TS750_I2C); Wire.write (REG_CONFIG); Wire.write (resolutionLevel[resolutionPointer]); Wire.endTransmission (); Serial.print ("The resolution is now set to: "); if (resolutionPointer == 0) Serial.println (" 9 bits"); if (resolutionPointer == 1) Serial.println ("10 bits"); if (resolutionPointer == 2) Serial.println ("11 bits"); if (resolutionPointer == 3) Serial.println ("12 bits"); if (resolutionPointer == 3) { resolutionPointer = 0; } else { resolutionPointer++; } } |
We enter this code from our soon to be written button press, and immediately we send the I2C address for the temperature sensor and tell it we’re going to write from the I2C Master to the Slave. Then we tell it that we want to change the configuration register, and then pass it the value of the configuration in the form of the array that holds our resolutions, and the pointer holding the array position. After that it’s a simple matter of incrementing the resolution pointer up one,unless it’s already at the highest point, three, in which case we reset to zero. In the middle, a couple of serial commands output the current resolution to the serial monitor as feedback.
Why is 3 the highest resolution pointer value?
Button Press
Reading a button press would seem fairly simple, however, we want there to be a one to one relationship between the button being pressed and the resolution being incremented. If we didn’t explicitly code it that way, we could easily run into the problem (as I did the first time I tried this), of just hammering through increaseResolution again and again and again as long as the button is held down, and since the Arduino processes that function in microseconds, we don’t have to hold down the button very long at all in order for things to get totally out of whack. Here’s the code that we’ll add to the loop…
|
1 2 3 4 5 6 7 8 |
int buttonPressRes = 1; while (digitalRead(resolutionButton) == HIGH) { if (buttonPressRes == 1) { buttonPressRes = 0; increaseResolution (); } } |
So, every time we run through the loop, the variable buttonPressRes is set to 1. Then, when the Arduino detects the Resolution Button being pressed, it enters the while loop and stays there as long as the button is held down. However, inside that while loop, it will only execute the increaseResolution function if buttonPressRes is equal to 1, which we change to zero immediately. That way we only execute the resolution change the first instant the button press is detected… the button has to be released in order for buttonPressRes to go back to 1.
Configuring the AT30TS750A to Read Temperature With A Button Press
Reading the temperature is much more simple, because we’ve already figured out most of the problems we could run across. In fact, we can use essentially the same routine to handle the button press, just using temperature function specific variables, and move the chunk of code from the previous tutorial that handles the temperature reading into its own function, which we’ll call grabTemperature…
Here are the three sections of button press code…
|
1 |
const int tempButton = 8; // DATA button used to start temperature measurement |
|
1 |
pinMode (tempButton, INPUT); |
|
1 2 3 4 5 6 7 |
int buttonPressTemp = 1; while (digitalRead(tempButton) == HIGH) { if (buttonPressTemp == 1) { buttonPressTemp = 0; grabTemperature (); } } |
Here is our code to read the temperature, now isolated into it’s own function…
|
1 2 3 4 5 6 7 8 9 10 11 12 13 14 15 16 17 18 19 20 21 22 |
void grabTemperature() { byte tempLSByte = 0; byte tempMSByte = 0; float floatTemperature = 0.0000; Wire.beginTransmission (AT30TS750_I2C); Wire.write (REG_TEMP); Wire.endTransmission (); Wire.requestFrom (AT30TS750_I2C, 2); tempMSByte = Wire.read(); tempLSByte = Wire.read() >> 4; floatTemperature = tempMSByte + (tempLSByte * 0.0625); Serial.print ("The temperature is... "); Serial.print (floatTemperature, 4); Serial.print ("C, "); Serial.print ((floatTemperature * (1.8)) + 32, 4); Serial.println ("F"); delay (100); } |
Putting It All Together
Here is the final code, cleaned up and organized. Again, it’s best if you try to code this yourself, rather than simply copying and pasting the working code into your sketch.
|
1 2 3 4 5 6 7 8 9 10 11 12 13 14 15 16 17 18 19 20 21 22 23 24 25 26 27 28 29 30 31 32 33 34 35 36 37 38 39 40 41 42 43 44 45 46 47 48 49 50 51 52 53 54 55 56 57 58 59 60 61 62 63 64 65 66 67 68 69 70 71 72 73 74 75 76 77 78 79 80 81 82 83 84 85 86 87 88 89 90 91 92 93 94 95 96 97 98 99 100 101 102 103 104 105 106 107 108 109 110 111 112 113 114 115 116 117 |
/* A sketch to retrieve the temperature from the AT30TS750A on the Rheingold Heavy I2C and SPI Education Shield. Pressing the "LATCH" button increments the resolution from 9, 10, 11, 12 bit and back to 9. Pressing the "DATA" button performs a temperature measurement and reads the results to the serial monitor. Website: https://rheingoldheavy.com/at30ts750a-tutorial-03-configuring-on-the-fly Datasheet: http://www.atmel.com/images/atmel-8855-dts-at30ts750a-datasheet.pdf */ #include "Wire.h" const int AT30TS750_I2C = 0x48; // I2C Address for the temperature sensor const byte REG_TEMP = 0x00; // Register Address: Temperature Value const byte REG_CONFIG = 0x01; // Register Address: Configuration const int resolutionButton = 7; // LATCH button used to set resolution const int tempButton = 8; // DATA button used to start temperature measurement int resolutionLevel[4] = {0x00, 0x20, 0x40, 0x60}; // Array of resolution levels, corresponding to 9, 10, 11, and 12 bit resolution set in the config register int resolutionPointer = 1; // Holds the position inside the resolution level array, preset to 0x20 void setup() { Wire.begin (); init_AT30TS750A (); pinMode (resolutionButton, INPUT); pinMode (tempButton, INPUT); Serial.begin (9600); Serial.println ("Press DATA to read temperature // Press LATCH to cycle through resolution"); } void loop() { int buttonPressRes = 1; int buttonPressTemp = 1; while (digitalRead(resolutionButton) == HIGH) { if (buttonPressRes == 1) { buttonPressRes = 0; increaseResolution (); } } while (digitalRead(tempButton) == HIGH) { if (buttonPressTemp == 1) { buttonPressTemp = 0; grabTemperature (); } } } void init_AT30TS750A() { /* Change the resolution of the temperature measurement 0x00 = 9 bit resolution 0x20 = 10 bit resolution 0x40 = 11 bit resolution 0x60 = 12 bit resolution */ Wire.beginTransmission (AT30TS750_I2C); Wire.write (REG_CONFIG); Wire.write (0x00); // Set Measurement Resolution Here Wire.endTransmission (); } void increaseResolution() { Wire.beginTransmission (AT30TS750_I2C); Wire.write (REG_CONFIG); Wire.write (resolutionLevel[resolutionPointer]); Wire.endTransmission (); Serial.print ("The resolution is now set to: "); if (resolutionPointer == 0) Serial.println (" 9 bits"); if (resolutionPointer == 1) Serial.println ("10 bits"); if (resolutionPointer == 2) Serial.println ("11 bits"); if (resolutionPointer == 3) Serial.println ("12 bits"); if (resolutionPointer == 3) { resolutionPointer = 0; } else { resolutionPointer++; } } void grabTemperature() { byte tempLSByte = 0; byte tempMSByte = 0; float floatTemperature = 0.0000; Wire.beginTransmission (AT30TS750_I2C); Wire.write (REG_TEMP); Wire.endTransmission (); Wire.requestFrom (AT30TS750_I2C, 2); tempMSByte = Wire.read(); tempLSByte = Wire.read() >> 4; floatTemperature = tempMSByte + (tempLSByte * 0.0625); Serial.print ("The temperature is... "); Serial.print (floatTemperature, 4); Serial.print ("C, "); Serial.print ((floatTemperature * (1.8)) + 32, 4); Serial.println ("F"); } |
Additional Challenges
Modify the sketch so that you use the 74HC595 to display the current resolution level.
Modify the sketch so that you are able to select the resolution level instead of cycling through it.

