[mathjax][/mathjax]I’ve spent the last three days writing up a notebook entry that attempted to cover the basics of transistor theory, and I realized that I don’t provide any value in that area. There are plenty of pages already dedicated to confusing the **** out of you with depletion regions and holes and emitter injection efficiency. There is a wealth of knowledge to be mined from that, and I’m sure some of it has practical uses. So, while I may publish that other piece (much) later, I’d rather build something with NPN transistors and then measure them to death. This will focus on NPN transistors in the “saturation” operating mode, meaning, using them like on-off switches.
UPDATE: This is a great article covering the basics of Bipolar Junction Transistors (BJTs) and MOSFETs: How Transistors Work
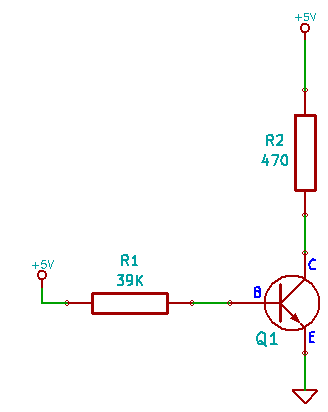
For our first circuit, we’ll keep it nice and simple: a 2N3904 transistor, two resistors and some voltage supplied by our friendly Arduino. Before we actually put this together, we do have to know a few things about the transistor.
First, it’s an NPN transistor, specifically a 2N3904, which is about as common and standard as they get. It has three pins: Collector, Base and Emitter, and since it’s an NPN, current will flow from the Collector to the Emitter when current is applied to the base.
The Collector / Emitter current can be many times greater than the current supplied to the base, which is why these things work as amplifiers. The amount of amplification, also referred to as “DC Current Gain”, “hFE”, or just the Greek letter ß, can vary from 20x to 300x depending on the current at the Collector, so you have to have a good sense of what kind of load you’re going to be putting on the thing.
The whole transistor, overall, has a maximum current rating called the “Collector Current – Continuous”, we we’ll need to take that into account when planning any kind of circuit (hello current limiting resistors). It can wind up getting pretty toasty too, particularly in amplification circuits, consequently, there are thermal characteristics that might need to be taken into consideration.
Because of the semiconductor material this thing is made out of, it has forward voltage drops just like a diode does, referred to as the Collector-Emitter Saturation Voltage and the Base-Emitter Saturation Voltage.
For this initial circuit, we’re not going to do anything other than build something that proves we can pull the correct information out of the datasheet and assemble it so that it produces expected results. You can refer to the datasheet from Fairchild Semiconductor for all of the ratings that we need.
Reading NPN Transistor Datasheets
Trying to read that whole datasheet at once, cover to cover, is a recipe for disaster. I’ve never been able to do that. I have to cut it into more reasonable chunks, so that’s what I’ve done here, with a liberal cutting and pasting.
Let’s start by understanding our voltage and current limitations.
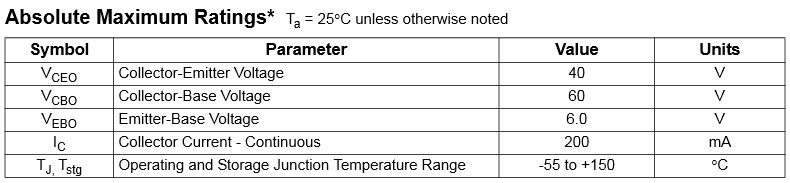
Since we’re going to be powering this thing with low voltage sources, in this case the 5V Arduino pin, we’re well within the voltage maximums described: Collector-Emitter max of 40V, Collector-Base max of 60V and an Emitter-Base max of 6.0V. The only one we’re even close to, is the Emitter-Base voltage, but that would require hooking the thing up backwards, so as long as we’re careful where we put our jumper wires, we’ll be fine.
Now let’s look at thermal characteristics…
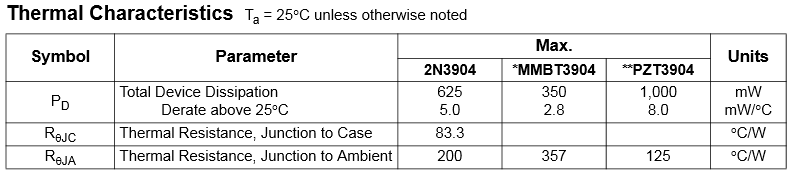
The device is able to dissipate a total of 625mW of power. Since Power = Volts x Amps, we have \(\mathrm {0.625W = 5V * I}\) which equals a max current of 125mA.
If we were going to try to operate this thing on a very hot factory floor, or in an unventilated enclosure where we could get up to, say 50°C, we would use the formula \(\mathrm{P_{d} = 625mW – (50^\circ C – 25^\circ C) * 5.0mW}\) and determine that we would actually be limited to 500mW of power dissipation due to the thermal derating. In that instance, using the P=VI formula again, we would actually be limited to 100mA of current over all. Fortunately, my lab is 23°C.
Our goal will be to have the optimal 100x gain… meaning that the current flowing at the Collector will be a 100x multiple of the current flowing at the Base, so we’ll be controlling 100x the amount of current with a very small control signal. In the datasheet, there is a table of data called “On Characteristics” and this will provide us with what we need to plan our circuit.
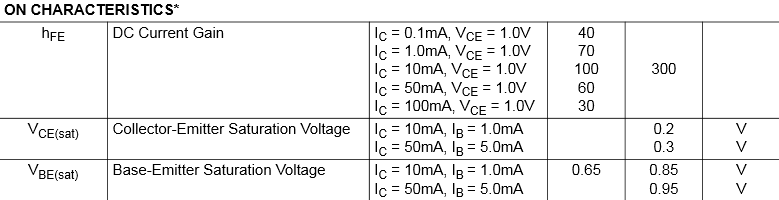
In the hFE section, we see that in order to achieve a 100x gain (amplification), we need to have 10mA of Collector current. Since we now know our Collector current, we can also determine the two saturation voltages, Collector-Emitter and Base-Emitter, 0.2V and 0.65V respectively.
Now it’s time to use Ohm’s Law to tie all of this together. Starting at the Collector, we have 5.00V supply voltage, and we want to achieve 10mA of current, therefore we have to determine the value of current limiting resistor to stick in there. We also have to remember the 0.2V Collector-Emitter saturation voltage.
\[\mathrm{R_{collector} = \frac{(5.00V – 0.20V)}{.010A} = 500Ω}\]
500Ω isn’t a standard resistor value, so we’ll go with 470Ω.
Now, for our Base, we have a 5.00V signal, and we need to determine the current we need to pump into the Base that will allow our 10mA of Collector current. The formula for that is…
\[\mathrm{I_{base} = \frac{I_{collector}}{hFE} = \frac{.010A}{100} = 0.0001A}\]
Okie doke, we’ve got our current, now we can use our signal voltage and the Base-Emitter Saturation Voltage to determine the current limiting resistor we need…
\[\mathrm{R_{base} = \frac{(5.00V – 0.70V)}{0.0001A} = 43000Ω}\]
Again, 43KΩ isn’t a standard resistor value, so we could go with 47K. In actuality, there are a few little bits of rounding here and there and, really, the Arduino doesn’t put out 5.00V, it puts out something closer to 4.80V on my Uno, so I’m actually going to go with 39K.
For purposes of completeness, the Emitter current can be determined by Kirchoff’s law: the sum of currents flowing into a node is equal to the sum of currents flowing out of that node.
\[\mathrm{I_{emitter} = 0.0100A + 0.0001A = 0.0101A}\]
Now, each of the parts of the schematic above should make sense. All we have to do now is build it and measure each of the locations to see if we’re seeing what we’re supposed to see!
[masterslider id=13]
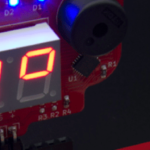
Our Base current is 0.10mA, our Collector current is 9.98mA and our Emitter current is 10.06mA! That’s pretty accurate if you ask me!
A Practical NPN Transistor Circuit
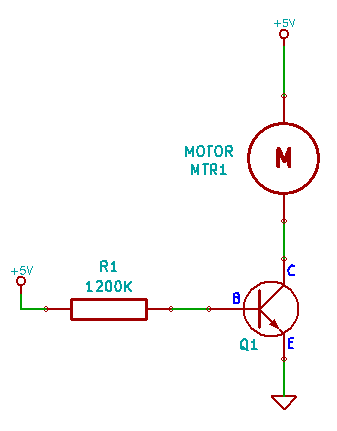
That first circuit was more example than anything. I want to focus on something more practical. Let’s say that you wanted to control a simple electric motor with your Arduino, like the one used in the Circuit Noise Control with DIY Optoisolator post.
Reading through the available data on the motor, you learn that it draws 70mA when the motor is just spinning itself, at full efficiency it will draw 250mA, and if you give it all the juice it wants, but prevent it from spinning (stall the motor), it will draw 500mA. We have a little DIY cooling fan glued to the shaft of the motor, so we know it will need to be somewhere greater than the unloaded 70mA, but way below the full efficiency of 250mA. I will conservatively estimate 100mA, based entirely on guessing.
We have a problem though. We want to control the motor, turn it off and on, but the digital pins on an Arduino are only able to source 40mA max. That’s barely more than half of what you need to just get the motor to spin by itself. The 5V pin, is able to deliver 200mA, but you can’t turn that pin on and off. So we need some solution that will allow us to use the 5V pin to power the motor, but still maintain control of it. Enter our handy NPN Transistor!
If we apply or remove a current to the base, we can enable or disable the 100mA current flow through the collector!
Looking through the datasheet again, we see that 100mA has an hFE of 30x, and we have also raised our saturation voltages to 0.3V Collector-Emitter and 0.95 Base-Emitter. To the math!
\[\mathrm{I_{base} = \frac{I_{collector}}{hFE} = \frac{.100A}{30} = 0.0033A}\]
\[\mathrm{R_{base} = \frac{(5.00V – 0.90V)}{0.0033A} = 1230Ω}\]
1230Ω isn’t a standard value, so we’ll go with a 1200Ω resistor.
The code to run on the microcontroller is as pretty dead simple as it gets: setup digital 3 as an output and drive it low and high, waiting 5 seconds between states.
|
1 2 3 4 5 6 7 8 9 10 11 12 13 14 15 16 17 18 |
int motorPin = 3; void setup() { // put your setup code here, to run once: pinMode (motorPin, OUTPUT); } void loop() { // put your main code here, to run repeatedly: digitalWrite(motorPin, LOW); delay (5000); digitalWrite(motorPin, HIGH); delay (5000); } |
After hooking it all up, it drew 3.30mA at the Base and 92.0mA at the Collector. Nearly exactly what we were expecting. Out of curiosity, I placed my finger against the tip of the motor shaft to create drag and see how much current it would start to draw, and it started to climb instantly, eventually stopping the motor at 130mA. Now, we know from our reading of the motor specs, that the stall current is much, much higher, 500mA. So what’s happening here?? Well, the collector is trying to draw more and more current to feed the beast, but the current at the base is remaining static… it will only allow a certain amount of current to flow, and if that isn’t enough to let the motor spin, then too bad. If you rerun the math to allow 130mA at the Collector, that means you need to allow 4.33mA of Base current (I’ll let you do the math this time), which means a current limiting resistor of 1KΩ (946.15Ω calculated). Substituting that resistor in, I was able to stall the motor at 140mA, and then getting courageous, I placed an 820Ω Base resistor in for 4.7mA of Base current, and was unable to stall the motor at 145mA, which was about as close as I felt like getting to the 200mA that would threaten to brick my ATMEGA328 or the voltage reg at the very least.