This is a visual guide for the various MicroView widget styles that are part of the MicroView Library. Please note that any fuzziness or lack of clarity in the display is due to the shutter speed of my camera having to be open long enough to capture the full display without worrying about refresh rates.
All examples are screenshots taken of the MicroView running the example sketch, “MicroViewWidgetDemo”, provided upon installation of the MicroView Library in the Arduino IDE. The full code is provided at the bottom for reference, and the library can be downloaded from the GeekAmmo GitHub Arduino Library repository.
MicroView Widget Styles – Sliders
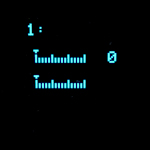 1. Horizontal MicroView Slider Style 0
widget1 = new MicroViewSlider(4, 16, 0, 100, WIDGETSTYLE0);
widget2 = new MicroViewSlider(4, 32, 0, 100, WIDGETSTYLE0 + WIDGETNOVALUE);
The top slider displays the numerical value to the right of the graphical display. The bottom slider suppresses the numerical value. In both cases, the triangle indicator slides left and right across the meter as the value changes by using the spin() method.
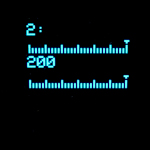 2. Horizontal MicroView Slider Style 1
widget1 = new MicroViewSlider(0, 10, 100, 200, WIDGETSTYLE1);
widget2 = new MicroViewSlider(0, 32, 100, 200, WIDGETSTYLE1 + WIDGETNOVALUE);
The top slider displays the numerical value below and justified with the left side of the slider. The bottom slider suppresses the numerical value. In both cases, the triangle indicator slides left and right across the meter as the value changes by using spin() method.
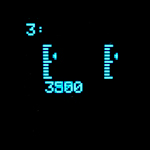 3. Vertical MicroView Slider Style 2
widget1 = new MicroViewSlider(10, 12, 0, 5000, WIDGETSTYLE2);
widget2 = new MicroViewSlider(48, 12, 0, 5000, WIDGETSTYLE2 + WIDGETNOVALUE);
The left slider displays the numerical value below and justified with the left side of the slider. The right slider suppresses the numerical value. In both cases, the triangle indicator slides up and down across the meter as the value changes by using the spin() method. Described in the documentation as “like 0, but vertical”.
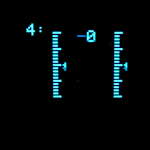 4. Vertical MicroView Slider Style 3
widget1 = new MicroViewSlider(16, 4, -20, 20, WIDGETSTYLE3);
widget2 = new MicroViewSlider(54, 4, -20, 20, WIDGETSTYLE3 + WIDGETNOVALUE);
The left slider displays the numerical value to the right of the slider. The right slider suppresses the numerical value. In both cases, the triangle indicator slides up and down across the meter as the value changes by using the spin() method. Described in the documentation as “like 1, but vertical”.
MicroView Widget Styles – Gauges
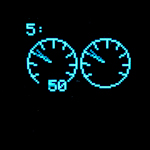 5. MicroView Gauge Style 0
widget1 = new MicroViewGauge(15, 24, 0, 200, WIDGETSTYLE0);
widget2 = new MicroViewGauge(48, 24, 0, 200, WIDGETSTYLE0 + WIDGETNOVALUE);
The left gauge displays the numerical value right justified at the base of the gauge, looking centered with a three digit value. The right gauge suppresses the numerical value. In both cases, the needle indicator rotates around the meter as the value changes by using the spin() method.
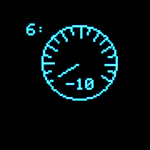 6. MicroView Gauge Style 1
widget1 = new MicroViewGauge(32, 24, -10, 150, WIDGETSTYLE1);
A single large gauge displaying the numerical value at the base, inside the circle of the gauge face. The needle indicator rotates around the meter as the value changes by using the spin() method.
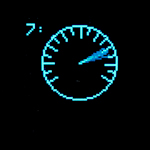 7. MicroView Gauge Style 1
widget1 = new MicroViewGauge(32, 24, 0, 240, WIDGETSTYLE1 + WIDGETNOVALUE);
A single large gauge with the numerical value suppressed. The needle indicator rotates, as above, around the meter however no value is present. Rotation is performed via the spin() method.
MicroView Widget Styles – Custom Value Displays
The following images are examples of the styles from above, with the default numerical value display suppressed, then replaced by a value in a different format in custom locations. The correspond with demos 8 through 13 in the code at the bottom.
[masterslider id=25]
|
1 2 3 4 5 6 7 8 9 10 11 12 13 14 15 16 17 18 19 20 21 22 23 24 25 26 27 28 29 30 31 32 33 34 35 36 37 38 39 40 41 42 43 44 45 46 47 48 49 50 51 52 53 54 55 56 57 58 59 60 61 62 63 64 65 66 67 68 69 70 71 72 73 74 75 76 77 78 79 80 81 82 83 84 85 86 87 88 89 90 91 92 93 94 95 96 97 98 99 100 101 102 103 104 105 106 107 108 109 110 111 112 113 114 115 116 117 118 119 120 121 122 123 124 125 126 127 128 129 130 131 132 133 134 135 136 137 138 139 140 141 142 143 144 145 146 147 148 149 150 151 152 153 154 155 156 157 158 159 160 161 162 163 164 165 166 167 168 169 170 171 172 173 174 175 176 177 178 179 180 181 182 183 184 185 186 187 188 189 190 191 192 193 194 195 196 197 198 199 200 201 202 203 204 205 206 207 208 209 210 211 212 213 214 215 216 217 218 219 220 221 222 223 224 225 226 227 228 229 230 231 232 233 234 235 236 237 238 239 240 241 242 243 244 245 246 247 248 249 250 251 252 253 254 255 256 257 258 259 260 261 262 263 264 265 266 267 268 269 270 271 272 273 274 275 276 277 278 279 280 281 282 283 284 285 286 287 288 289 290 291 292 293 294 295 296 297 298 299 300 301 302 303 304 305 306 307 308 309 310 311 312 313 314 315 316 317 318 319 320 321 322 323 324 325 326 327 328 329 330 331 332 333 334 335 336 337 338 339 340 341 342 343 344 345 346 347 348 349 350 351 352 353 |
/* MicroView Arduino Library Copyright (C) 2014 GeekAmmo This program is free software: you can redistribute it and/or modify it under the terms of the GNU General Public License as published by the Free Software Foundation, either version 3 of the License, or (at your option) any later version. This program is distributed in the hope that it will be useful, but WITHOUT ANY WARRANTY; without even the implied warranty of MERCHANTABILITY or FITNESS FOR A PARTICULAR PURPOSE. See the GNU General Public License for more details. You should have received a copy of the GNU General Public License along with this program. If not, see <http://www.gnu.org/licenses/>. */ #include <MicroView.h> // The Arduino build process doesn't create a prototype for the spin function, // (probably because it has a function pointer as a parameter) // so it's added here. void spin(int16_t lowVal, int16_t highVal, int16_t stepSize, unsigned long stepDelay, void (*drawFunction)(int16_t val)); MicroViewWidget *widget1, *widget2; int16_t prevVal; // previous widget value void setup() { uView.begin(); } void loop() { /* ==================== Demo 1 ==================== Horizontal slider style 0, with and without numeric value. Range 0 to 100. ================================================ */ demoNumber(1); widget1 = new MicroViewSlider(4, 16, 0, 100); widget2 = new MicroViewSlider(4, 32, 0, 100, WIDGETSTYLE0 + WIDGETNOVALUE); spin(0, 100, 5, 100, update2widgets); delete widget1; delete widget2; /* ==================== Demo 2 ==================== Horizontal slider style 1, with and without numeric value. Range 100 to 200. ================================================ */ demoNumber(2); widget1 = new MicroViewSlider(0, 10, 100, 200, WIDGETSTYLE1); widget2 = new MicroViewSlider(0, 32, 100, 200, WIDGETSTYLE1 + WIDGETNOVALUE); spin(100, 200, 5, 100, update2widgets); delete widget1; delete widget2; /* ==================== Demo 3 ==================== Vertical slider style 2, with and without numeric value. Range 0 to 5000. ================================================ */ demoNumber(3); widget1 = new MicroViewSlider(10, 12, 0, 5000, WIDGETSTYLE2); widget2 = new MicroViewSlider(48, 12, 0, 5000, WIDGETSTYLE2 + WIDGETNOVALUE); spin(0, 5000, 250, 100, update2widgets); delete widget1; delete widget2; /* ==================== Demo 4 ==================== Vertical slider style 3, with and without numeric value. Range -20 to 20. ================================================ */ demoNumber(4); widget1 = new MicroViewSlider(16, 4, -20, 20, WIDGETSTYLE3); widget2 = new MicroViewSlider(54, 4, -20, 20, WIDGETSTYLE3 + WIDGETNOVALUE); spin(-20, 20, 2, 100, update2widgets); delete widget1; delete widget2; /* ==================== Demo 5 ==================== Gauge style 0, with and without numeric value. Range 0 to 200. ================================================ */ demoNumber(5); widget1 = new MicroViewGauge(15, 24, 0, 200, WIDGETSTYLE0); widget2 = new MicroViewGauge(48, 24, 0, 200, WIDGETSTYLE0 + WIDGETNOVALUE); spin(0, 200, 10, 100, update2widgets); delete widget1; delete widget2; /* ==================== Demo 6 ==================== Gauge style 1, with numeric value. Range -10 to 150. ================================================ */ demoNumber(6); widget1 = new MicroViewGauge(32, 24, -10, 150, WIDGETSTYLE1); spin(-10, 150, 8, 100, update1widget); delete widget1; /* ==================== Demo 7 ==================== Gauge style 1, with no numeric value. Range 0 to 240. ================================================ */ demoNumber(7); widget1 = new MicroViewGauge(32, 24, 0, 240, WIDGETSTYLE1 + WIDGETNOVALUE); spin(0, 240, 4, 33, update1widget); delete widget1; /* ==================== Demo 8 ==================== Slider style 0, with no numeric value. Value manually displayed in hexadecimal. Range 0 to 0xff. ================================================ */ demoNumber(8); widget1 = new MicroViewSlider(4, 16, 0, 0xff, WIDGETSTYLE0 + WIDGETNOVALUE); spin(0, 0xff, 5, 39, customSlider0); delete widget1; /* ==================== Demo 9 ==================== Slider style 1, with no numeric value. Value manually displayed, centred above the slider. Range -30000 to 30000. ================================================ */ demoNumber(9); widget1 = new MicroViewSlider(2, 24, -30000, 30000, WIDGETSTYLE1 + WIDGETNOVALUE); spin(-30000, 30000, 1500, 50, customSlider1); delete widget1; /* ==================== Demo 10 ==================== Slider style 2, with no numeric value. Value manually displayed. Pointer moves from low at the top to high at the bottom. Range 0 to 600. Note: The widget getValue() method will return a wrong value. It is changed to reverse the pointer direction. ================================================ */ demoNumber(10); widget1 = new MicroViewSlider(20, 10, 0, 600, WIDGETSTYLE2 + WIDGETNOVALUE); spin(0, 600, 30, 100, customSlider2); delete widget1; /* ==================== Demo 11 ==================== Slider style 3, with no numeric value. Value manually displayed, beside the pointer. Range 0 to 11. "These go to eleven!" - Nigel Tufnel of Spinal Tap. ================================================ */ demoNumber(11); widget1 = new MicroViewSlider(24, 2, 0, 11, WIDGETSTYLE3 + WIDGETNOVALUE); prevVal = widget1->getValue(); spin(0, 11, 1, 250, customSlider3); delete widget1; /* ==================== Demo 12 ==================== Gauge style 0, with no numeric value. Value manually displayed beneath, with a decimal point, in a larger font. "km/h" added to the bottom of the gauge. For simplicity, the range and values are actually 10 times what is to be displayed, so they can be set, stored and manipulated as integers. Range 0.0 to 20.0 (actually 0 to 200). ================================================ */ demoNumber(12); widget1 = new MicroViewGauge(35, 17, 0, 200, WIDGETSTYLE0 + WIDGETNOVALUE); // draw the fixed "km/h" text uView.setCursor(widget1->getX() - 11, widget1->getY() + 11); uView.print("km/h"); spin(0, 200, 1, 40, customGauge0); delete widget1; /* ==================== Demo 13 ==================== Gauge style 1, with no numeric value. Value manually displayed as a letter. Range 1 to 26 (A to Z). ================================================ */ demoNumber(13); widget1 = new MicroViewGauge(36, 24, 1, 26, WIDGETSTYLE1 + WIDGETNOVALUE); spin( 1, 26, 1, 200, customGauge1); delete widget1; /* ================== end of loop() ================== */ } // Function to update widget1 void update1widget(int16_t val) { widget1->setValue(val); } // Function to update widget1 and widget2 void update2widgets(int16_t val) { widget1->setValue(val); widget2->setValue(val); } // Update function for Demo 8 void customSlider0(int16_t val) { widget1->setValue(val); uView.setCursor(widget1->getX() + 34, widget1->getY() + 1); uView.print("0x"); if (val < 0x10) { // add leading 0 if necessary. Only 2 digits supported. uView.print('0'); } uView.print(val, HEX); } // Update function for Demo 9 void customSlider1(int16_t val) { widget1->setValue(val); uint8_t offsetY = widget1->getY() - 10; uint8_t offsetX = widget1->getX() + 14; uView.setCursor(offsetX, offsetY); uView.print(" "); // erase the previous value in case it's longer // calculate the offset to centre the value offsetX += ((widget1->getMaxValLen() - widget1->getValLen()) * 3); uView.setCursor(offsetX, offsetY); uView.print(val); } // Update function for Demo 10 void customSlider2(int16_t val) { uView.setCursor(widget1->getX() + 1, widget1->getY() + 24); widget1->drawNumValue(val); // calculate to reverse the pointer direction widget1->setValue((int16_t) ((int32_t) widget1->getMaxValue() + (int32_t) widget1->getMinValue() - (int32_t) val)); } // Update function for Demo 11 void customSlider3(int16_t val) { int16_t maxVal = widget1->getMaxValue(); uint16_t range = (uint16_t) (maxVal - widget1->getMinValue()); uint8_t offsetX = widget1->getX() + 9; // erase previous value. // pointer position is calculated the same way as the widget code. uint8_t offsetY = (float)(uint16_t)(maxVal - prevVal) / (float)range * 40; uView.setCursor(offsetX, offsetY); uView.print(" "); // This is being lazy. Should calculate width for value. // draw new value offsetY = (float)(uint16_t)(maxVal - val) / (float)range * 40; uView.setCursor(offsetX, offsetY); widget1->drawNumValue(val); widget1->setValue(val); } // Update function for Demo 12 void customGauge0(int16_t val) { widget1->setValue(val); uView.setCursor(widget1->getX() - 17, widget1->getY() + 19); uView.setFontType(1); // add leading space if necessary, to right justify. // only 2 digit (plus decimal) numbers are supported. if (val < 100) { uView.print(' '); } uView.print((float)val / 10, 1); uView.setFontType(0); } // Update function for Demo 13 void customGauge1(int16_t val) { widget1->setValue(val); uView.setCursor(widget1->getX() - 2, widget1->getY() + 9); uView.print((char)(val + 'A' - 1)); } // Clear the screen buffer and draw the demo number in the corner void demoNumber(int num) { uView.clear(PAGE); uView.setCursor(0, 0); uView.print(num); uView.print(":"); } // Spin up, then down, through the values. // // For each value, call the update function and display the new screen. void spin(int16_t lowVal, int16_t highVal, int16_t stepSize, unsigned long stepDelay, void (*drawFunction)(int16_t val)) { drawFunction(lowVal); uView.display(); prevVal = lowVal; delay(1500); for (int16_t i = lowVal + stepSize; i <= highVal; i += stepSize) { drawFunction(i); uView.display(); prevVal = i; delay(stepDelay); if ((i == 0) && (lowVal != 0)) { // pause briefly for a value of 0 delay(750); } } delay(1500); for (int16_t i = highVal; i >= lowVal; i -= stepSize) { drawFunction(i); uView.display(); prevVal = i; delay(stepDelay); if ((i == 0) && (lowVal != 0)) { // pause briefly for a value of 0 delay(750); } } delay(1500); } |
