We need to send more than a single bit at a time, and using the previous code would make our sketch a total mess for more than a few bits of data. We need more efficient ways of sending that data.
Objectives
- Refine the original bit banging code.
- Understand the term bit shifting and how to implement it.
- Understand how shiftOut() works.
Background
Fundamentals of Serial Communications
Electrical View of the Shift Register
Boolean and Bitwise Operators
Schematic
Education Shield – Shift Register Subsystem
Setup
For this module, you’ll need the following equipment:
- Education Shield or the Manual Serial Communications Trainer
- Arduino UNO R3
1. Place jumpers on each of the 74HC595 Enable block pins along the edge of the Education Shield. This will enable microcontroller interaction with the shift register.
2. Mate the Education Shield with your Arduino UNO R3.
3. Finally, connect your Arduino to your USB cable, and upload this little sketch to drive the OE pin low.
|
1 2 3 4 5 6 7 |
void setup() { int oePin = 5; pinMode (oePin, OUTPUT); digitalWrite (oePin, LOW); } void loop() {} |
Alternatively, you can use the Manual Serial Communications Trainer instead. Connect 5V and CLR to 5V, GND and OE to GND, DATA to D8, LATCH to D7, and CLOCK to D6. The code above is not necessary in this configuration.
Brute Force Control Part II
In the previous module we sent individual bits, either a one or a zero, to the Arduino, and needed to reset the board (open and close serial monitor) in between each bit to maintain some form of control. Obviously, that’s about as crude a level of control as you can achieve.
Suppose we wanted to turn all the bits on at once. Expanding on the code we had originally, you could just blow it entirely out of proportion and do this…
|
1 2 3 4 5 6 7 8 9 10 11 12 13 14 15 16 17 18 19 20 |
digitalWrite (dataPin, HIGH); // Ensure the data pin is low digitalWrite (clockPin, HIGH); // Clock the 1st bit digitalWrite (clockPin, LOW); digitalWrite (clockPin, HIGH); // Clock the 2nd bit digitalWrite (clockPin, LOW); digitalWrite (clockPin, HIGH); // Clock the 3rd bit digitalWrite (clockPin, LOW); digitalWrite (clockPin, HIGH); // Clock the 4th bit digitalWrite (clockPin, LOW); digitalWrite (clockPin, HIGH); // Clock the 5th bit digitalWrite (clockPin, LOW); digitalWrite (clockPin, HIGH); // Clock the 6th bit digitalWrite (clockPin, LOW); digitalWrite (clockPin, HIGH); // Clock the 7th bit digitalWrite (clockPin, LOW); digitalWrite (clockPin, HIGH); // Clock the 8th bit digitalWrite (clockPin, LOW); digitalWrite (dataPin, LOW); // Ensure the data pin is low digitalWrite (latchPin, LOW); // Set the latch pin to 0V digitalWrite (latchPin, HIGH); // Bring the latch high to commit the bit to the shift register outputs |
There, all the lights are turned on. If you modify it to keep the data line low, you can turn them all back off again. You could tighten it up by turning the repetitive command into a for loop, but really, we need to step away from the hard coded output, and allow this to accept varying values in full byte increments: full byte = 8 bits :: shift register = 8 bits available.
Bit Shifting
Image we want to send the value B01100101 to the shift register. We need to meet the following requirements…
- We need to set our data pin to the appropriate state
- We need to cycle our clock pin high/low while holding the data pin in that state
- We need to do this eight times
Starting at the bottom, doing something eight times is easy: for (i = 0; i < 8, i++). In that for loop, cycling the clock pin is easy as well, just use digitalWrite to send the pin high and then low again. The tricky part is number 1, cycling through the values of the byte and using it to set our data pin in the appropriate state.
Fortunately, the idea of “TRUE” and “1” and “5V” and “HIGH” are all pretty much interchangeable conceptually, and as it turns out, in Arduino code as well. So if we want to set the data pin high, we just tell it digitalWrite(dataPin, 1);, and if we want to set the data pin low, we substitute a zero for the one. However, that doesn’t get us past the brute force method above, unless we cycle through the byte we send. We can do that by using bit shifting. By bit shifting, we take a one/zero value and move it right or left by using double greater than / less than symbols: << or >> meaning left and right respectively.
So we can process something eight times, and we can move bits left and right a specific distance by bit shifting. The last thing we need to do, is extract each of the bits from our binary data in sequence and that’s where we can utilize the bitwise and boolean operators. We will make use of the & and ! operators to do a little manipulation with the end goal of determining whether the bit in each of the bit positions 0-7 is a one or a zero.
First, let’s set up a loop to process each of the bits. We’re working with a one byte chunk of data, so that means 8 bits (as mentioned above).
|
1 2 3 4 5 6 |
int i; byte inputValue; inputValue = B01100101; for (i = 0; i < 8; i++){ } |
We’ve created a byte sized variable called “inputValue” and loaded our B01100101 into it. Then we create the for loop, and whatever we put in there is going to happen eight times with the value of i incrementing from 0 through 7. We also know that we’re going to need to cycle the clock pin to sample the state of the data pin, so let’s add that as well.
|
1 2 3 4 5 6 7 8 |
int i; byte inputValue; inputValue = B01100101; for (i = 0; i < 8; i++){ digitalWrite(clockPin, HIGH); digitalWrite(clockPin, LOW); } |
The only thing left now is to process our byte of data. Somehow we need to boil the entire bunch of zeros and ones into a defined state for each position. Let’s use the &, our inputValue, and some bit shifting. Let’s start off with the absolute basic statement and build from there…
inputValue & 1 << 0
This will process, using the AND logic, and return the following…
|
1 2 3 4 |
B01100101 & B00000001 ----------- B00000001 |
Ok, so we have isolated the first bit and discovered that it’s a one! In the example above, inputValue is the top line, and the value of B00000001 is created by taking the value of 1 and shifting it zero bytes left. The bitwise operation flows through and you are left with the original value of only the number in the least significant bit position, in fact, as long as the rest of our test byte is full of zeros, we can shift that single one all over the place and filter out what exists in that same position in inputValue. Now, we can start to shift our test bit over the length of the inputValue to determine the rest of the bits.
inputValue & 1 << 1
|
1 2 3 4 |
B01100101 & B00000010 ----------- B00000000 |
inputValue & 1 << 2
|
1 2 3 4 |
B01100101 & B00000100 ----------- B00000100 |
inputValue & 1 << 3
|
1 2 3 4 |
B01100101 & B00001000 ----------- B00000000 |
inputValue & 1 << 4
|
1 2 3 4 |
B01100101 & B00010000 ----------- B00000000 |
inputValue & 1 << 5
|
1 2 3 4 |
B01100101 & B00100000 ----------- B00100000 |
inputValue & 1 << 6
|
1 2 3 4 |
B01100101 & B01000000 ----------- B01000000 |
inputValue & 1 << 7
|
1 2 3 4 |
B01100101 & B10000000 ----------- B00000000 |
Ok, we have a filtering method established now that will take all the bit positions of inputValue and isolate them. Notice that when it matches a zero, the entire resulting byte is a zero, which is a low. That’s half the problem solved! We can just set our dataPin to that result, cycle the clock and we can clock in zeros all day long. Our high values are a little trickier. When a one is filtered out, we don’t end up with 1, which would be B00000001, we wind up with the filtered out one in whatever bit position it was in originally, surrounded by a bunch of zeros. We can use the NOT operator to work with this though. If you take any non-zero value, x, and apply the NOT to it, you receive a zero. If you take a zero value, x, and apply the NOT to it, you receive a 1. If you take that result and NOT it again, you are left with a nice clean one or zero indicating that the original value was either zero or not-zero. Here’s an example…
|
1 2 3 4 5 6 7 |
x = 25 !x = 0 !!x = 1 x = 0 !x = 1 !!x = 0 |
How does this help us? Take each of the binary output results of our AND statements above, and run them through the double NOT, and you are left with exactly the state you need for setting the dataPin output. So if we wanted to set the dataPin high or low depending on the value of the 5th bit, we can break the process down in this example…
Isolate the 5th bit…
inputValue & 1 << 5
|
1 2 3 4 |
B01100101 & B00100000 ----------- B00100000 |
Here’s what’s going to be tested when we execute the double not…
|
1 2 3 |
x = B00100000 = 0x20 = 32 !x = 0 (because !someNonZeroValue = Zero) !!x = 1 (because !0 = 1) |
Set the dataPin to the state of the 5th bit by putting it all together.
digitalWrite(dataPin, !!(inputValue & 1 << 5))
Now you put this together with our original for loop, and use our incrementing value of i for how far to shift our filter and you wind up with…
|
1 2 3 4 5 6 7 8 9 |
int i; byte inputValue; inputValue = B01100101; for (i = 0; i < 8; i++){ digitalWrite(dataPin, !!(inputValue & 1 << i)); digitalWrite(clockPin, HIGH); digitalWrite(clockPin, LOW); } |
Let’s take all of that, and put it into a fully useable sketch we can upload…
|
1 2 3 4 5 6 7 8 9 10 11 12 13 14 15 16 17 18 19 20 21 22 23 24 25 26 27 28 29 30 31 32 33 34 35 36 37 38 39 40 41 42 43 44 45 |
/* Basic Sketch To Break Down The Functioning of Shift Out. https://rheingoldheavy.com/bit-shifting-74HC595/ */ // Set the pin connections from the shift register int clockPin = 6; int latchPin = 7; int dataPin = 8; int oePin = 5; void setup() { pinMode(latchPin, OUTPUT); pinMode(dataPin, OUTPUT); pinMode(clockPin, OUTPUT); pinMode(oePin, OUTPUT); digitalWrite(clockPin, LOW); digitalWrite(dataPin, LOW); digitalWrite(latchPin, LOW); digitalWrite(oePin, LOW); } void loop() { int i; byte inputValue; inputValue = B01100101; for (i = 0; i < 8; i++){ digitalWrite(dataPin, !!(inputValue & 1 << i)); digitalWrite(clockPin, HIGH); digitalWrite(clockPin, LOW); } digitalWrite (latchPin, LOW); digitalWrite (latchPin, HIGH); } |
If you upload that into your Arduino, your Education Shield should display the following LED pattern.
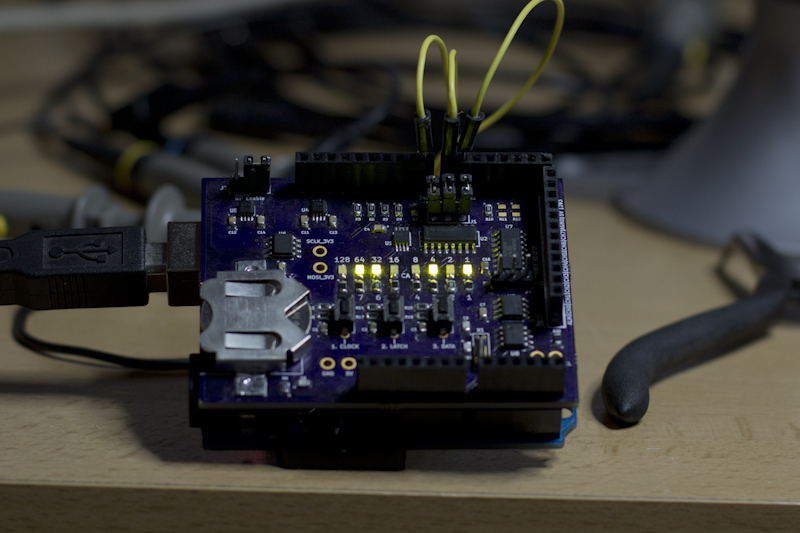
The actual underlying electrical signalling looks like this…
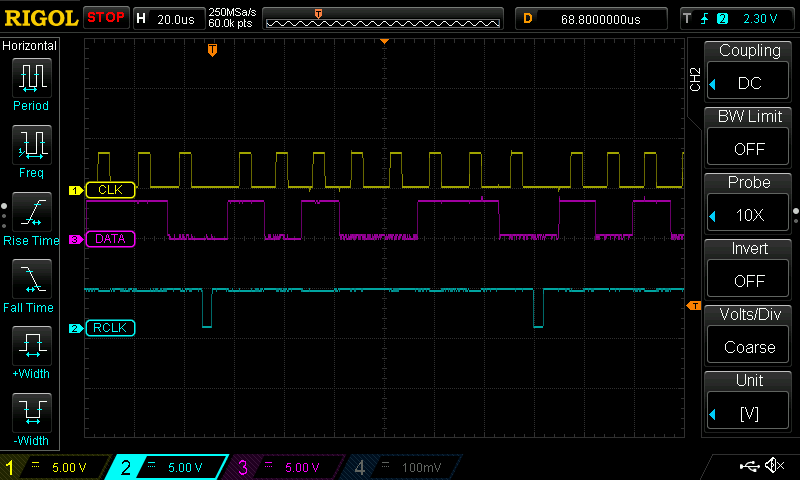
The yellow trace is the clock, the purple is the data and the blue is the latch. I’ve triggered on the latch and you can see the eight evenly spaced clock pulses, with nicely arranged data pulses ready to be sampled on the leading edge of the clock. If you look at the leading edge of each clock cycle, and check the state of the data beneath it, you’ll see HIGH, LOW, HIGH, LOW, LOW, HIGH, HIGH, LOW :: B10100110 … our original byte pattern submitted LSB first.
What we’ve just done is recreate the built-in shiftOut() command piece by piece. This is a commonly used command in the Arduino library, and the source code for it can be found in the Arduino/hardware/arduino/cores/arduino/wiring_shift.c file, along with its corresponding shiftIn() command. The command provided by Arduino is a little more fleshed out, in that it also allows you to specify the direction you want to read the bits: LSB first or MSB first.
This gives you a look under the covers at how serial byte streams are constructed, and how they are transmitted. The shiftOut command is written in the Processing language, which is why you see the digitalWrite command being used in there. This is inherently slow, as Processing is an abstraction from the underlying C commands. A lot of things need to happen to allow digitalWrite to happen that are outside the scope of serial communications and have much more to deal with basic microcontroller interactions such as initializing the appropriate PORT, assigning a clock, setting the alternate or analog function, configuring this bit, assigning that bit, etc, etc. The Arduino developers boiled a lot of that down into pinMode and digitalWrite.
What we’ll see as we go into the more advanced I2C and SPI communications schemes, is that Processing is abandoned in the underlying libraries in favor of plain C code, and in some cases C code is abandoned in favor of writing assembly code directly.
Here are some examples to help visualize the process of the bit shifting…
