In Part 4 we described the way that the comparator circuit disables the 5V USB voltage in the presence of a voltage on VIN. That post was a little long already, so this post will cover selecting the parts to build that subsystem.
Build An Arduino UNO R3 from Scratch Table of Contents
The Comparator Op-amp
The official schematic shows a part number listed for the comparator op-amp as an LMV358IDGKR. Without having looked it up yet, I’m guessing that this is a basic dual op-amp (meaning two op-amps in a single package), and the “IDGKR” chunk of the part number just indicates the footprint. When we look at the circuit for the Pin 13 LED, we’ll see how the second op-amp in the package is being used, since only one is necessary to act as a comparator.
Popping that part number into parts.io, confirms my suspicion, and the good news is, it’s inexpensive, low risk, with loads of them in distributor inventory. We won’t have to go searching for a suitable replacement.
There are a lot of specs associated with amplifiers that can get you lost in the weeds, but our application is very simple: when the VIN level rises above a certain point, we want to slam the output straight to the VCC+ rail. If the output was fed back in to one of the inputs, it wouldn’t go all the way to VCC+, but to some intermediate balance point to make both inputs equal, but in this case, the output doesn’t interact with the inputs at all, so any difference is going to force a full output swing to one rail or the other.
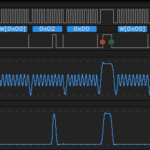
VIN is going through a 10K/10K voltage divider, and the “certain point” is the reference 3V3 voltage. So, as soon as VIN rises to 3.3V X 2, 6.60V, the level of the non-inverting input will cause the output to flip from GND to 5V. The LD1117S50TR 5V Fixed LDO has a drop out voltage of around 1.1V, so you’d need a minimum of 6.1V to get it to do anything in the first place. Ultimately, we cut off the 5V USB source more than 500mV before the LDO could possibly come into conflict with it. Since no one will realistically ever connect a 6.60V supply to VIN, instead of the more realistic 7V or 9V or 12V, that means the specs all line up nicely.
The question of “how fast will it react”, is answered by the slew rate specification. The speed with which the LMV358 can change it’s output is listed in the datasheet as 1V/uS, so about 5uS to go from one state to the other.
The 3V3 Fixed LDO Regulator
The Arduino designers thought it important to provide a 3V3 voltage source on the board, and are conveniently using that to provide the comparator reference voltage while they’re at it. My guess is that they wanted the board to be able to source voltage to a wider variety of components than you can power with only 5V, and there are a lot more 3V3 components out there every day.
So, we have to make some 3V3, and the part listed in the schematic is an LP2985-33DBVR. Again, looks like a Texas Instruments part based on the footprint designation of DBVR, and with “33” in there, definitely seems like a fixed 3V3 output voltage regulator. Sure enough, it’s a TI 3.3V fixed LDO regulator, with a nice low 1.0 risk. The drop out voltage ranges from 7mV when supplying 1mA of output current to 280mV under a 150mA load.
We should look at the quiescent current, the amount of current that the LP2985 draws even when it’s not doing a thing. The datasheet says it draws 65uA under no load which isn’t much at all. That suggests it won’t have a major effect on anything else we might connect to 5V_LDO.
The 3V3 Fixed LDO Regulator Capacitors
This has me truly baffled. The datasheet for the LP2985 clearly describes the input and output capacitors necessary for stable operation, but the schematic only shows a 1uF ceramic cap on the output and no input cap.
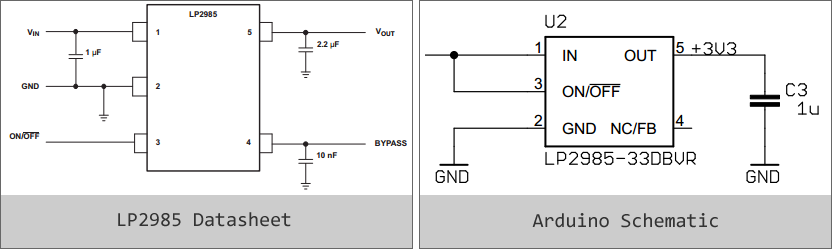
As the voltage that is being supplied to the input is guaranteed to be regulated, either by the USB host or the Arduino 5V LDO, perhaps they decided they didn’t need to include the input cap for the added stability? The datasheet is extremely explicit though that input and output capacitors are necessary for stable operation, and expresses clearly what the acceptable values of capacitance and ESR can be.
Without any reasonable explanation for why the capacitors are missing from the schematic, I’m going to follow the datasheet guidelines:
- Input Capacitor: 1uF minimum (can be increased without limit) with no ESR requirements.
- Output Capacitor: 2.2uF minimum (can be increased without limit) with an ESR of 0.01Ω – 0.8Ω.
Because Texas Instruments went to great pains to develop a Voltage Regulator with such easy specs on the capacitors, and ESR isn’t a factor for the input cap, it makes it relatively trivial to pick one. So I’ll go with the 1uF C0805C105K8RACAUTO from Kemet. It’s not the lowest risk part, but I’m familiar with Kemet and familiarity breeds selection bias 🙂 It’s only a 10V capacitor, but if it ever sees anything other than 5V, a lot of other things will have been destroyed on the board.
For the output cap, we can still stay ceramic, but we do need to be a little careful with ESR. Here’s the thing, I have spent two days… TWO DAYS… trying to understand how to spec these things out, and got lost down the rabbit hole of poles and holes and frequency vs. ESR vs. load current and I’ve decided to push this out. What I need for the design at this point, is SOME ceramic capacitor, preferably in an 0805 package, between 2.2uF and 3.3uF. There are tens of thousands of these things in existence, and I’ll find the right one. Just not now, because I’ve got to get moving with this and don’t want to waste any more time in the weeds. So, let’s just put a pin in this and note on the schematic that it needs more work.
UPDATE
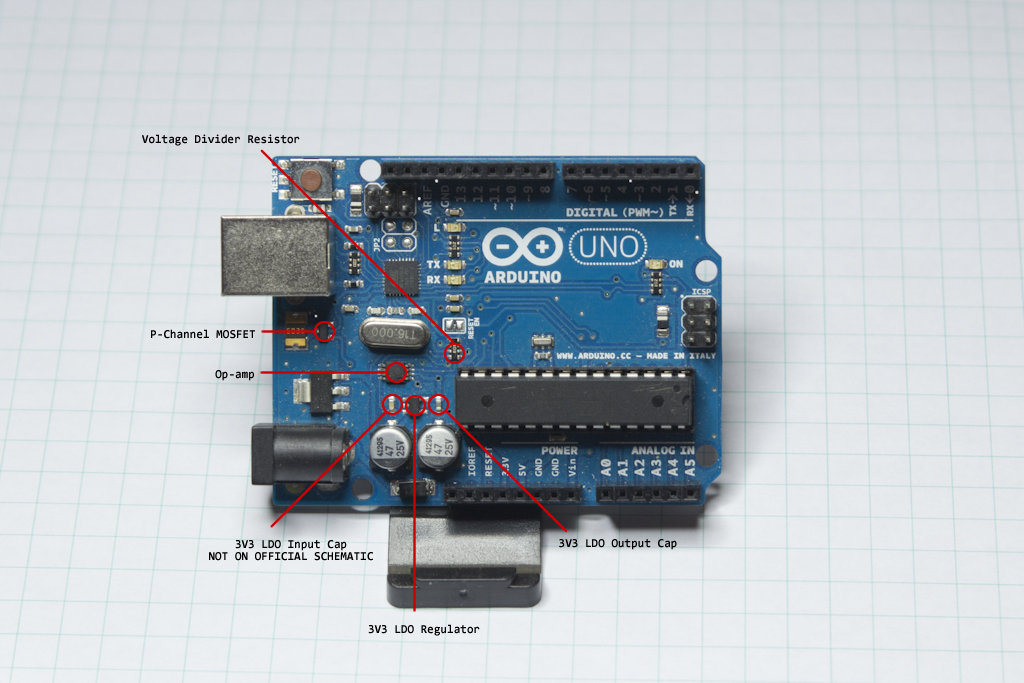
As I was putting together the annotated board picture below, I saw the little capacitor to the left of the 3V3 Regulator, and after looking at it under magnification, I thought, “well THAT looks suspiciously like it’s connected between the trace going from the op-amp and the 3V3 LDO, and Ground. I bet that’s the input capacitor!” After testing conductivity with my multimeter, sure enough, it’s the input capacitor that doesn’t appear on the official schematic. I have no idea what size it is, what sort, anything. But at least it’s there, so that solves a bit of that mystery. I’ll still go with the one I spec’d out myself.
P-Channel MOSFET
Our little silicon switch that allows or prevents USB_VCC from connecting to the 5V rail, is listed on the schematic as a FDN340P, a P-Channel MOSFET, because the Drain-Source resistance, RDS(on), drops to around 80mΩ when the Gate is at some voltage lower relative to the Source. It can be confusing looking at the datasheet for this particular part, because most of the voltage values are listed as negative, due to the P-Channel nature of the MOSFET. What we’re concerned with is the voltage value that must be present at the gate to drive the Drain-Source resistance one direction or the other, the Gate-Source Threshold Voltage, VGS(th). The datasheet calls this value out as -0.8V. When the gate is at USBVCC – 0.8V or below, it will open wide the gates and merry little electrons can dance and do their thing. Above USBVCC – 0.8V, the Drain-Source resistance will rise to a level that effectively cuts out USBVCC. According to the USB specification, USBVCC will be at some level between 4.75V and 5.25V, so we would expect that MOSFET balance point to be between 3.95V and 4.45V. This shouldn’t fluctuate, it’s just the variation level that’s allowed on the USB Voltage Bus: you’ll have a steady voltage somewhere between those two.
Voltage Divider Resistors
These are just uninteresting 10K resistors. Nothing special, just need two of them. Arduino designed in resistor networks, but I’ll go with individuals.
Voltage Comparator KiCad Schematic
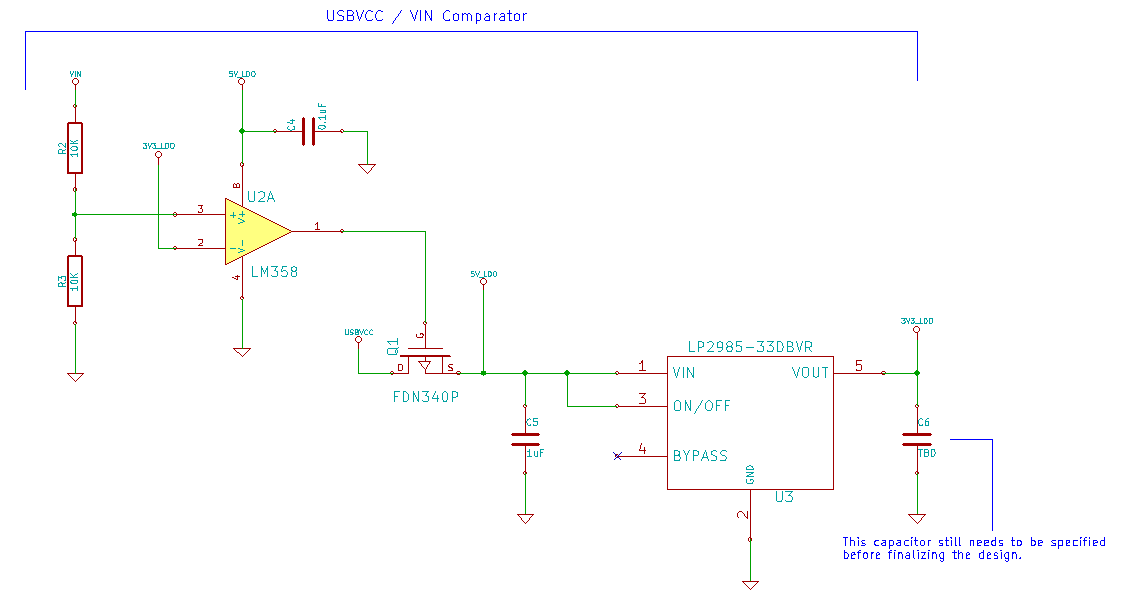
All of the above component decisions have been incorporate into the schematic, including leaving the specific manufacturer and part number blank for the 3V3 regulator output capacitor.
Here is the BOM for this portion of the schematic: Arduino UNO R3 Voltage Comparator Subsystem BOM
In the next part, we’ll cover the Pin 13 LED, which isn’t as simple as you might think!