With our detailed component information maintained inside our schematic, we now need to focus on ensuring that we get the best quality data out again, when we export our BOM for vendors.
The export process is as simple as click on the BOM button (or Tools -> Generate Bill of Materials)…
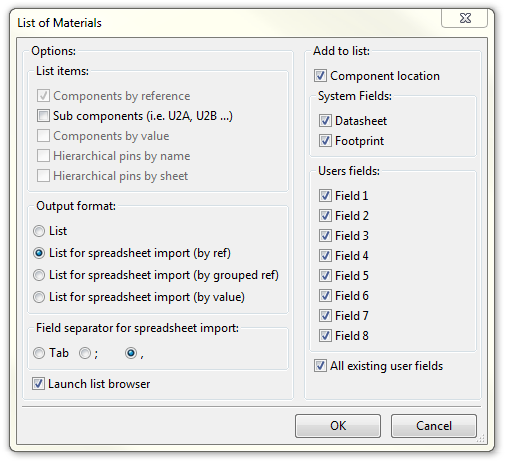
You’re presented with a dialog box, which will ask you some formatting questions…
The radio buttons under “Output Format” tend to govern what other aspects of the export are greyed out, so you’ll want to play around to get a full understanding of which selections you would make to provide the correct information to the audience that will be receiving the BOM you’re generating.
List
This option creates a .lst file, a plain text file that you can open up in your editor of choice. I’m a Notepad++ man, myself. I personally, don’t find this very useful.
List for spreadsheet import (by ref)
This option creates a CSV file with a single line item for ever component in your schematic. If R1 and R2 are exactly the same component, they will still be listed separately, regardless.
List for spreadsheet import (by grouped ref)
This option is supposed to create a CSV file with all the matching components grouped together, with an item count at the end. Unfortunately, it doesn’t work. In order for components to be grouped together, not only do all of the custom fields have to be exactly the same, but the annotation has to be sequential. So if R1 is exactly the same as R3 in every way, but R2 isn’t, you’ll still wind up with three line items instead of two, which is essentially useless. Even when it does have everything constrained in a way that would allow it to function, it doesn’t output “R1, R2, R3, R4”, it outputs “R1..R4″… and sometimes not even that, but “R1..R1R4”. Avoid this setting.
List for spreadsheet import (by value)
This option is supposed to group everything by value, but unfortunately suffers from the same failures as “by grouped ref” does above.

You can see that the description field is the only discrepancy between these four items, so R1 and R4 should have been grouped together, but were not. Also, the “Item Count” field is inexplicably moved over a column.
I think we’re stuck exporting a full list using “List for spreadsheet import (by ref)” with all the details, and establishing a standard workflow to sort it out after the fact.
All the formatting and exporting details are designed around using Microsoft Excel as your spreadsheet management tool of choice. Other tools will most likely have other results.
When you do export, you need to make two very important selections. First, export using a semicolon or tab as your delimiter, because commas will pop up in description fields everywhere, and you don’t want to have them . Second, when you select the file name to export, don’t save it as a .csv file, but as a .txt file. This way no assumptions will be made about delimiters prior to you being able to do some formatting on it. As an aside, if you choose to include the datasheet link, it winds up populating it twice, so I always deselect that option.
You’ll go through several iterations, for sure. You’ll have forgotten to put place holder “~” markings in some fields, you’ll have some fields reversed, stuff like that. After a few rounds though, you’ll get an export that looks tasty, like this…
At this point, we have very useable raw data. Those of you with greater text parsing / Python skills than I, can most likely take this and run with it easily. I’m going to stick to using Excel (don’t laugh).
The Rheingold Heavy KiCad BOM File Configurator
I’ve created an Excel 2007 file that will take the “List for spreadsheet import (by ref)” export from the BOM Exporter tool in eeSchema, and swizzle it in any number of ways.
- It will take your export and create a BOM file with the correctly named header fields, which, frankly, isn’t all that remarkable.
- It will collapse your BOM into quantities, which is what I wish KiCad would do by default, but as described above, it doesn’t do effectively. This is keyed off of the Manufacturer’s Part Number column, so if you have matching MPNs, then they’ll be condensed into a single line, with the schematic reference designators comma separated and a quantity added to the end.
- It generates a BOM file preformatted for import into the BOM Manager tools of Octopart, Digi-Key or Mouser. I tried Parts.io but their BOM upload system doesn’t map fields correctly at this time, so I’ve hidden that for now.
- It will meld your BOM output and Position files (both front and back side copper), into a single file that will be useful for any contract manufacturers. They’ll have all the reference designators, manufacturer names, part numbers, sourcing information and positioning all in one place.
It also has the ability to customize the output, so you can pick and choose which columns you want included, and in what order.Actually, I disabled the customized output, because I don’t have time right now to implement that.

Now, the truth is, at this point this tool is kind of like your friend that just started Karate, comes home with the rubber knife and says “Here, attack me with the knife like this!” and shows you the one and only single way he’s found to disarm someone. This requires your custom fields in KiCad to essentially be the same as the ones I listed in Part 1 of KiCad BOM Management.
The important thing is that it do the same task repeatedly, and in exactly the same fashion. This way you know exactly what it is you’re sending to your contract manufacturers and distributors.
I’ll post the Excel file to GitHub, but I seriously make no representations as to the quality of this tool, or that it might not actually destroy your BOM export (which is ok, since you can just re-export). Also, don’t look at the code. For God’s sake, don’t look at the code. It’s an embarrassment, and I didn’t put a single comment in there as of now. This isn’t even Alpha… it’s proof of concept. But as I find time here and there to refine it, I’ll do so, and the changes will flow through to GitHub.
For more KiCad tutorials, Click Here.


